How to Install Vcenter 6.5 on Esxi Host
Moving forward, vCenter Server Appliance (vCSA) 6.5 is the preferred vCenter deployment method. The latest 6.5 release, brings with it a bag-full of goodies that include native HA, embedded Update Manger and inbuilt backup / restore functionality, features you won't find in vCenter Server for Windows.
When vSphere 6.0 was released, vCSA and its Windows counterpart stood on equal footing in terms of the features set offered. This, however, is no longer the case with vCSA now leading the race which is why I now tend to opt for the appliance version of vCenter.
Today's post deals with the task of installing vCSA 6.5. I have gone through the essentials and requirements in myHow to install vCenter Server 6.5 for Windows, so I'll spare you the details as the bulk of it equally applies to installing vCSA. So instead of repeating myself, I put together a series of 3 videos outing the installation process. Hopefully, this should make the post a little bit more interesting.
In particular, I cover how to:
- Set up DNS using a Windows DNS server.
- Install an external Platform Services Controller (PSC).
- Install vCSA 6.5 using the external PSC just created.
Preparing DNS
The first step is to come up with hostnames and corresponding IP addresses for the PSC and vCSA, something like this:
psc65-a.vsphere65.local –> 192.168.16.50
vcsa65-a.vsphere65.local –> 192.168.16.51
Using a DNS server running on a Windows box within my test lab, I went ahead and created a new DNS zone called vsphere65.local. In addition to this, I also created the above listed Forward Lookup (A) records. The Reverse (PTR) records are created automatically if the corresponding tick-box is left checked.
The DNS setup process is captured in the next video.
Deploying the PSC and vCSA
Both the PSC and vCSA can be deployed using any of two methods; a command line based installer or a GUI driven one. Since simple is generally better, I've opted for the GUI installer. The steps are as follows:
Step 1: Download the latest vCSA 6.5 ISO frommy.vmware.com.
Step 2: Mount the ISO on the Windows box from where the installation is carried out.
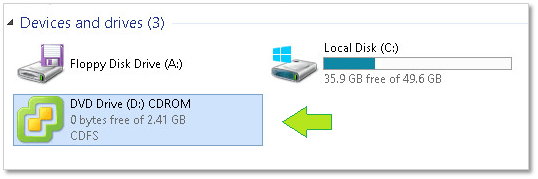
Install vCSA 6.5: Mounting the ISO installer in Windows
Step 3: After the ISO is mounted, drill down to the vcsa-ui-installer\win32 folder and run installer.exe.
Important: Make sure that the Windows box from where the installation is carried out is able to resolve the DNS records previously created (see Prepping DNS).
Installing the Platform Services Controller
Select the Install option from the installer's opening screen. It's then just a matter of following the installation wizard as shown in the upcoming video.
- Double-check DNS resolution i.e. make sure that the DNS records created beforehand can be resolved from the Windows box. In the video, I verify this during the installation process but in practice it's better to do this before you actually start installing. This way, you avoid stumbling halfway the install just because you misspelled the DNS name.
- The installer will automatically create the vCSA VM and assign to it the proper resources.
- Note that the installation is a two-stage process where the appliance is installed first and configured later.
Once the install finishes, the appliance may be further configured by visiting https://psc65-a.vsphere65.local:5480 and logging in as root .
For all other management operations, such as adding identity sources, users and groups and so on, use https://psc65-a.vsphere65.local/psc/.
Note: URLs will obviously differ in accordance to the DNS names chosen for the appliance and PSC.
Installing the vCenter Server Appliance
With the PSC out of the way, we can go ahead and install vCSA. Yet again, the install is a two-stage affair as per the next and final video. The same checks and installation procedure apply. During the second stage, you have to specify the details entered for the PSC. This is required since we've opted for an external PSC rather than an embedded one.
After the installation completes, the vCSA can be managed using the vSphere Web Client or the HTML5 client which, as mentioned many a time, is still a works in progress. Also remember, that the thick (C#) vSphere client can no longer be used to connect to vCenter Server. You can still however connect and manage ESXi 6.5 with it just to add a little bit more to the confusion when it comes to which vSphere client to use!
Conclusion
Deploying vCenter Server Appliance using an embedded or external PSC, has never been so easy. In addition, vCSA now comes with an embedded Update Manager (VUM) – no need for a separate Windows box – and a plethora of assorted features not in the least native HA, features that are absent in the Windows version of vCenter. This makes picking vCSA 6.5 a no-brainer, for me at least, when it comes to which version of vCenter to deploy. As always, however, make sure to weigh in all your options and requirements before jumping in.
[the_ad id="4738″][the_ad id="4796″]
How to Install Vcenter 6.5 on Esxi Host
Source: https://www.altaro.com/vmware/installing-vcenter-vcsa-6-5/